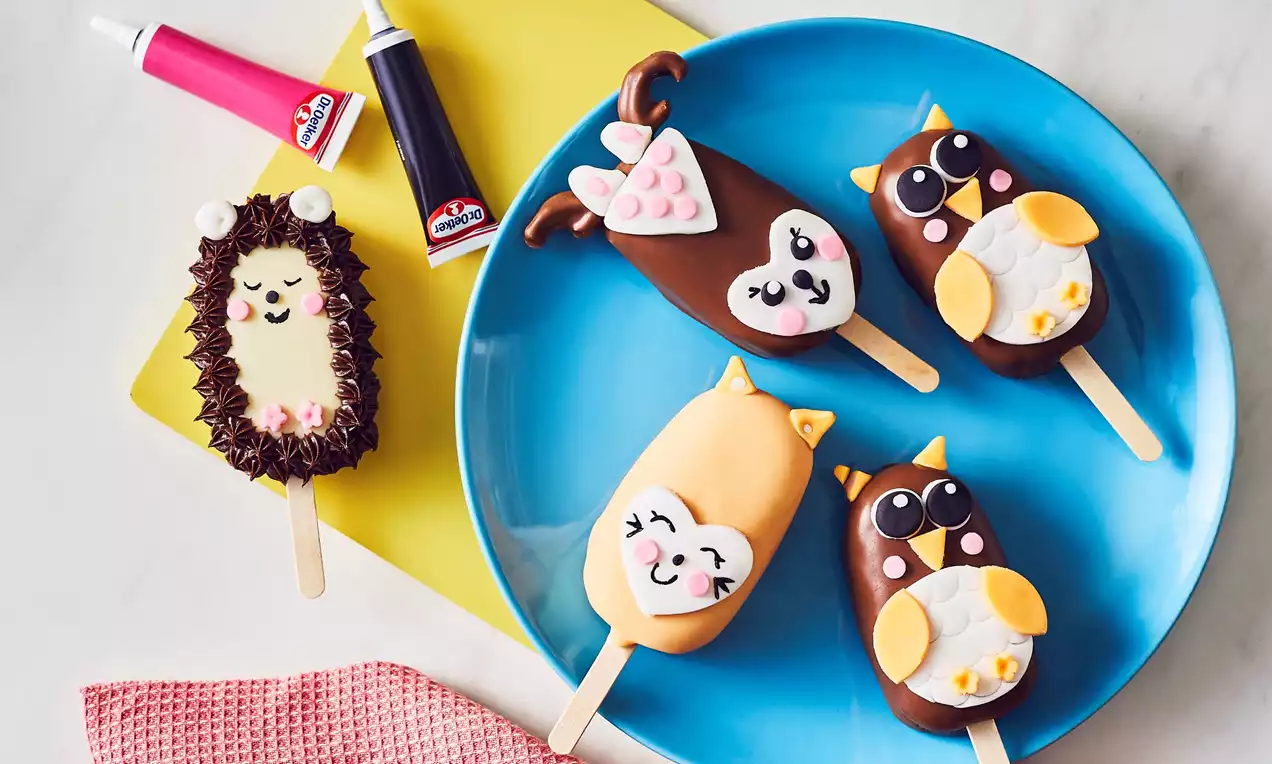
Kawaii Woodland Creature Cakesicles
Ingredients
Preparation:
First things first, pop your vanilla sponge in a food processor a whiz up until your sponge is a fine crumb. You might need to do this in a few stages depending on how big your food processor is.
Pop your sponge and Buttercream into a bowl and mix together until your mixture starts to clump together.
Now it’s time to get your hands messy; pop a handful of sponge mixture into the ice lolly moulds and push down to fill the mould, if you are using small ice lolly moulds you should be able to make about 8 cakesicles. If you don’t have a mould don’t worry you can create cake pops by rolling the sponge mixture into balls and creating little cake pops!
Push the lolly sticks into the base of each cakesicle. – top tip to make sure the cakesicles don’t drop off the sticks dip to end of the lolly stick into some melted chocolate before pushing into the cakesicle!
Pop your cakesicles into the freezer to set for 30 minutes.
Now it’s time to get creative and create these cute little creatures. Melt the white chocolate in the microwave, heat for 30 seconds and stir, continue to heat for 10 seconds until your chocolate has fully melted.
Dip 2 of your cakesicles in melted white chocolate, it’s easiest to do this one at a time and gently tap the cakesicle on the edge of the bowl to remove any excess chocolate.
Pop the dipped cakesicles on a tray or board lined with baking parchment to let the chocolate set. Add a few drops of Orange Colour Gel to the remaining White Chocolate and mix through to create an light orange shade, if the chocolate becomes quite thick don’t worry just pop it back in the microwave for 5-10 seconds. Dip 2 more cakesicles into the orange coloured chocolate.
Now time to melt the Milk Chocolate, just like you did with the white chocolate.
Dip the 4 remaining cakesicles into your milk chocolate to coat them and leave them to set.
Now it’s time to add the features! Divide the white fondant into 4 equal pieces. Leave one pieces white and pop in a sandwich bag and keep covered to make sure it doesn’t dry out. Now time to colour the other pieces! Flatten one piece of fondant and blob a few drops of Pink Colour Gel onto the fondant and fold the fondant over the colour gel then begin to knead in the colour gel. The fondant might become a bit sticky if this happens add a little icing sugar or corn flour to your work surface and hands! Knead the icing until you have an even shade of pink. Now time to do the same for the Orange Colour Gel and Black Colour Gel. You should now have white, pink, orange and black fondant, place them all in a sandwich bag to stop them drying out.
Now to make the hedgehogs; squeeze a few drop of Black Colour Gel into a small bowl and using a paint brush, paint kawaii eyes and mouth onto the 2 cakesicles covered in white chocolate. Add 2 small balls of pink fondant for the cheeks and an even smaller bowl of fondant for the nose. Place the Chocolate Buttercream in piping bag fitted with a small star nozzles and pipe stars of buttercream around the edge of the hedgehog to look like spikes. Finish the hedgehog with 2 balls of white fondant for ears and to little pink feet – we used a small flower cutter for the feet but a flattened balls of fondant will work fine if you do not have a cutter.
Next up the fox; take your 2 orange covered cakesicles. Roll out some white fondant and cut out 2 heart shapes, if you do not have a cutter why not cutter a heart shape out of baking parchment and use this to cut around. Place the heart shape on the cakesicle and paint on the kawaii face. Pop on 2 balls of pink fondant for the cheeks and flatten slightly. Finally add orange fondant ears and finish with a dot of white fondant in each ear.
Now it’s time to make the deer; using 2 of your milk chocolate covered caksicles add a heart shaped face like you did for the foxes and a white fondant triangle on the top of the deer’s head. Paint on the face and add a black fondant nose. Add pink fondant cheeks and dots on top of the white fondant triangle. Add 2 little white fondant ears to each deer and antler – you can either use black fondant for the antler or for a tasty treat we used chocolate dipped pretzels broken in half to create an antler look!
Finally lets make the owl, using your final 2 milk chocolate covered cakesicles, cut out and pop a circle onto the cakesicle, use a nozzle to create the feather effect on the fondant. To make the eyes layer up white fondant, black fondant and a white dot in the top corner of the eye. Use orange fondant to make the owl feet, ear, beak and wings. Finally add the pink cheeks!
Ta-dah look how cute your cakesicles look!
Related Recipes
Cupcake and Fairy Cake Recipes
Ice Cream Cupcakes
Cupcake and Fairy Cake Recipes
Lemon Cupcakes
Cupcake and Fairy Cake Recipes
Cake Jars